

Atmospheric perspective refers to the effect the atmosphere has on the appearance of objects (in this case, mountains), as they are viewed from a distance. This effect tends to make the mountains, or hills, take on a lighter and lighter value as their distance increases.

With watercolor, we can achieve this effect by layering washes, in order to build up to the dark values gradually.
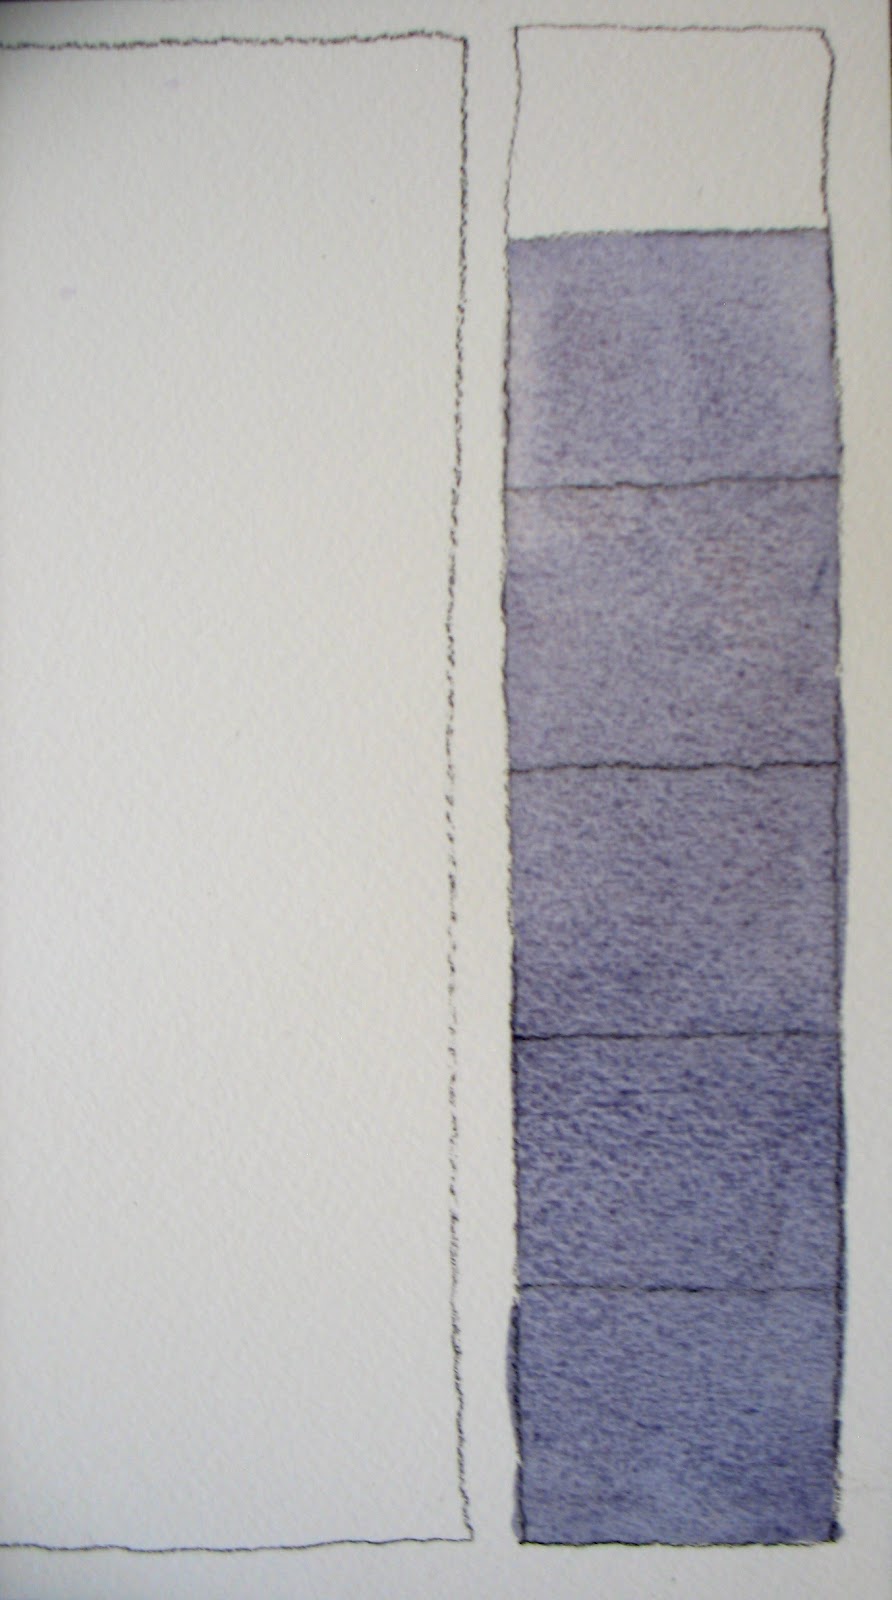
Start out by drawing two rectangles (freehand) on your watercolor paper. The skinny rectangle down the right-hand side of the paper will become a value scale. . .

Now mix a GRAY, using French Ultramarine and Burnt Sienna. I like to mix my grays instead of using a gray from a tube, because the result is much more interesting. Once you have the gray color you like, add enough water to it to make a very light version of it. Make sure you have enough to cover the entire big rectangle and most of the skinny one.

With this light gray wash, paint all of the skinny rectangle, except for the top square. . .
Before proceeding, make sure you have a tissue handy. No, I'm not going to make you cry . . . we're going to create clouds with it.
Now, paint the entire big rectangle with this light wash. When painting a wash onto dry paper, it's helpful to have your paper/board at a slight tilt.
While this is still wet, lay your board flat, take a piece of the tissue, and roll it across the top of the paper. . . you can do this more than once . . .

Let this wash dry completely.

Now, draw the furthest mountain ridge with pencil. Using the same wash mixture, first paint the value scale, starting with the 3rd box from the top -- all the way to the bottom. Next, paint this light gray wash from the pencil line (the mountain ridge) down -- to the bottom of the rectangle. Remember to have your board tilted, so that gravity helps you keep a "bead" at the bottom of your wash. Each time you pick up more paint on your brush and come back to the paper, you will only touch this bead of paint, while you work your way down to the bottom. Don't go back to what you've already painted.
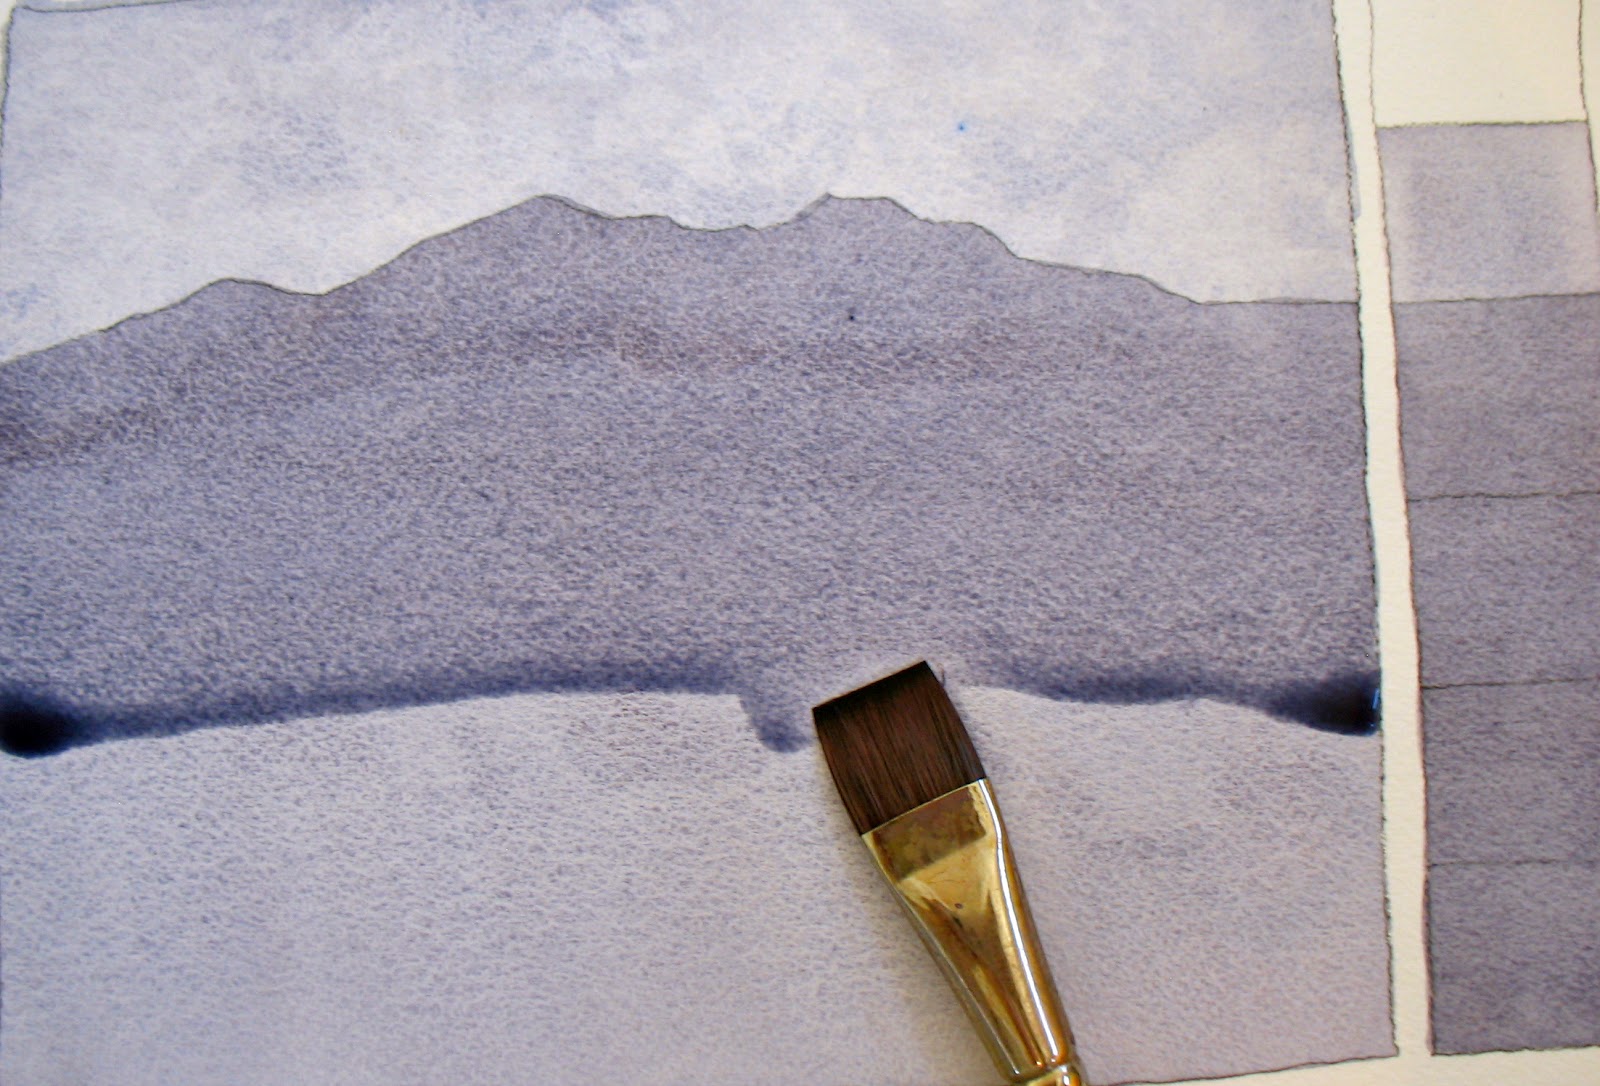
Let this layer dry completely. If necessary, you can use a hair dryer after each layer.

At this point, you'll need to mix some more gray, using the same two colors. You can make this wash a little darker -- a medium value gray. With this mixture, paint the value scale, starting with the 4th box down, and paint all the way to the bottom. Then, draw another pencil line, depicting a closer mountain range. Paint this wash from the pencil line down to the bottom of the paper.

Now, make your wash stronger by adding more pigment. Add another pencil line -- tree-lined hills. No details, just indicate by the edge that these are trees. Then, paint the bottom two squares of the value scale with this stronger wash, and then paint from the pencil line down to the bottom of the paper. If, after painting this, you feel that you haven't made the wash a dark enough value -- dry your paper with a hair dryer, and paint it again with the same wash.

Add enough pigment to your wash to make your darkest dark -- almost black. Paint your last box black. Draw the top of a hill in the foreground, and paint it black.

. . . and you're finished! You can see how we've succeeded, through the use of a full range of values -- from light to dark -- to get a sense of depth in our painting.
This is great. First page I opened on your site. Your photographs are nice and clear, and your instructions. I am looking forward to seeing what else your have. Thank you for this one.
ReplyDeleteYour welcome.
Deletevery clear instructions...thank you for sharing!
ReplyDeleteBeautiful! Thank you very much.
ReplyDeleteThank you so much for sharing - your instructions are easy to follow and a pleasure to carry out!
ReplyDeleteBecause I used to paint with oils and could put light on dark has made it harder to take up watercolor. But this illustration has really helped! I like mixing colors instead of using right from the tube also.
ReplyDeleteThank you. This is one of the first lessons a student of watercolor should complete.
ReplyDeleteThank you all for your comments -- I'm so glad that you found this helpful. This is one of the reasons that I love watercolor so much -- the fact that you can layer and glaze in order to get the correct value.
ReplyDeleteJust finished this. I enjoyed it.
ReplyDeleteThanks for the great advise. I finished three paintings using the technique you describe and love it.
ReplyDeleteThis is brilliant! Thanks!
ReplyDeleteThank you this has been the most concise and direct lesson I have seen. I've tried doing value studies but seeing the gradation on the side of the study really makes it really clear. Thank you please continue with the lessons.
ReplyDeleteWill do.
DeleteI have just started to work with watercolors. What I would stress to any beginner is when you say "a very light version" that means very light. Sample on scrap paper to be sure it is what you will be satisfied with, even if it dries lighter. My mistake was making the first wash too dark and also did not pay close enough attention to the color mix. Lesson learned. So, keep it LIGHT, you can aways make it darker but cannot make it lighter. Thanks for taking the time to put together this site.
ReplyDeleteWonderful explanations.
ReplyDeleteI just finished this lesson - thank you so much for sharing your knowledge. I have been struggling to learn watercolors on my own for a long time! After finding your blog, I finally feel like I'm making progress because of your clear explanation! I'm so excited to move on to the next one!!! :)
ReplyDeleteI can't wait to try this out! :-) Thanks for the tutorial!
ReplyDeleteI can't wait to try this out! :-) Thanks for the tutorial!
ReplyDeleteI want to try it out but I have to finished the pen drawing inc
ReplyDeleteThanks for sharing this informative information about water color paints with us. It's very helpful. Keep it up!
ReplyDeleteMuy buena la explicación!!! Muchas gracias!!!
ReplyDeletekırşehir
ReplyDeletekütahya
maraş
nevşehir
ordu
sinop
sivas
X13AW4
Eskişehir
ReplyDeleteAdana
Sivas
Kayseri
Samsun
05MP0V
Konya
ReplyDeleteKayseri
Malatya
Elazığ
Tokat
07O
kocaeli evden eve nakliyat
ReplyDeletekilis evden eve nakliyat
bursa evden eve nakliyat
trabzon evden eve nakliyat
hakkari evden eve nakliyat
İCWMZ
D3AB5
ReplyDeleteAntalya Şehirler Arası Nakliyat
Çerkezköy Çatı Ustası
Amasya Şehir İçi Nakliyat
Kars Lojistik
Uşak Lojistik
Aydın Şehir İçi Nakliyat
Artvin Lojistik
Kütahya Şehir İçi Nakliyat
Iğdır Evden Eve Nakliyat
C13C1
ReplyDeleteKırklareli Lojistik
Samsun Şehirler Arası Nakliyat
Ankara Şehirler Arası Nakliyat
Batıkent Fayans Ustası
Samsun Lojistik
Muğla Evden Eve Nakliyat
Adana Evden Eve Nakliyat
Balıkesir Şehir İçi Nakliyat
Çanakkale Şehir İçi Nakliyat
6C3FC
ReplyDeleteÇerkezköy Bulaşık Makinesi Tamircisi
Ünye Çelik Kapı
Karapürçek Fayans Ustası
Bayburt Şehir İçi Nakliyat
Samsun Şehir İçi Nakliyat
Manisa Şehir İçi Nakliyat
Tokat Şehir İçi Nakliyat
Karapürçek Boya Ustası
Gümüşhane Şehir İçi Nakliyat
DB46E
ReplyDeletehakkari ucretsiz sohbet
sakarya telefonda canlı sohbet
ücretsiz görüntülü sohbet
siirt rastgele sohbet siteleri
siirt canlı sohbet siteleri ücretsiz
görüntülü sohbet uygulamaları ücretsiz
görüntülü sohbet sitesi
konya yabancı görüntülü sohbet
giresun sesli sohbet uygulamaları
7D972
ReplyDeleteniğde sohbet
ücretsiz sohbet sitesi
bursa parasız görüntülü sohbet uygulamaları
erzincan sohbet siteleri
kadınlarla sohbet
Istanbul Telefonda Kadınlarla Sohbet
telefonda kadınlarla sohbet
Ağrı Canlı Sohbet Bedava
kilis canli sohbet chat